
Warship Combat : Navies at War
V1.3 Players Manual
(Updated 2/17/2023)
(Copyright © 2013-2023 Naval Warfare Simulations)
CLICK HERE FOR THE WCNAW WEBSITE
CLICK HERE FOR THE WCNAW SHIP DATA CHARTS - PDF FORMAT
Warship
Combat : Navies at War
V1.3 Players Manual
(Updated 2/17/2023)
(Copyright
© 2013-2023 Naval Warfare Simulations)
CLICK
HERE FOR THE WCNAW WEBSITE
CLICK
HERE FOR THE WCNAW SHIP DATA CHARTS - PDF FORMAT
...
Main Website:
http://www.navalwarfare.net
Software Store: https://nws-software.com/products/warship-combat-navies-at-war
Forums:
https://nws-online.proboards.com/
Email support questions, feedback, and suggestions to : wmiller.nws@gmail.com
Click
the links below to move to the selected section.
Click on
“Contents”
anywhere
in this manual to return to this section.
Combat Viewer / Interface Section / Ship Deployment Map
Division Deployment / Quick Battle Generator / Ship Division Deployment Interface
Search/Fire Control Radars (WW2)
Fleet Size / Divisions of Ships / Date
Nationality / Ship or Class Names / Crew Ratings
Weather / Sea State / Visibility
Tactical and Evasive Maneuvers
Torpedo Protection System - WW2
Firepower / Armor / Damage Results
Damage Effects / Damage Control
Losing Contact and Disengaging Ships
Load and Save Scenario Options
Editing TXT Based Scenarios Manually
Introduction / Designer Notes
Warship Combat : Navies at War (AKA WCNAW) is a detailed and accurate, yet easy to play, tactical naval surface combat turn based wargame for the computer that allows you to command a fleet of up to 32 warships vs. an effective and challenging AI. The engine is capable of combat covering 1890 to 1950. There are 6+ countries and 400+ classes of warships to choose from ranging from destroyers to battleships. Features include combat animations, various weather conditions, fire controls, radars (WW2), weapons targeting, main, secondary, and tertiary gun batteries, torpedo batteries, full stereo sound effects, tactical maneuvers, intuitive interface, detailed ship graphics, smoke screens, star shells, searchlights, system damage, structural and floatation damage, and much more! Future expansions and engine upgrades will add more ships, navies, land, the ability to fight larger battles, and other features. Designing scenarios is very simple and the system includes a wide range of scenario building options. There is a built in scenario design interface or you can easily edit the scenario text files.
This naval wargame follows the concept of "looks can be deceiving". Even though WCNAW is designed to be easy to play, it is not just a matter of comparing gunnery, armor, and other factors. The ratings and factors shown in the ship data charts are indicators of what a warship is capable of in combat however the wide range of detailed combat mechanics, tactical choices, and calculations are what determines how a warship actually fights. In the gunnery and torpedo PK calculations sections of this manual you will see a list of calculations that give some idea of how detailed the combat mechanics systems are in terms of combat resolution.
As this wargame is specifically designed for solitaire play the AI is obviously a critical feature and the quality and capability of the AI is taken very seriously. The AI is very competent, not mechanical, will put up a tough fight, and uses a variety of tactics. The AI does not use strict nationality based naval doctrines; there is a reason for this. The idea of designing a naval wargame is to allow for a variety of tactics to be tried in combat and not just play out what was done every time in actual naval history otherwise we might as all well just read the battle histories over and over again. The AI has a built in threat and combat analysis system the takes into account the abilities of the warships involved in the battle and decides on a variety of tactics to use for maneuvers, gunnery, and torpedo attacks. The AI will try to maximize the effect of its attacks and maneuvers and analyzes the status of the battle continuously. In every update that is posted, especially when new features are added that effect the combat mechanics, the AI is re-calibrated to help insure that it has the same choices of naval tactics as the player does so neither the player, nor or the AI, has any unfair advantage over the other. There is also a game option feature that allows you to set the aggressiveness level of the AI.
The
overall goal of this design is to allow for ease of play via an
intuitive single screen interface while utilizing a detailed and
accurate modeling of naval combat that does not sacrifice realism for
playability. More levels of detail are already being planned as WCNAW
will continue to be improved on through future downloadable updates.
We also listen very carefully to all constructive feedback posted on
our forums. Additional future plans include compatibility with a
campaign handler so players can fight through entire naval campaigns,
the addition of more navies, warship classes, etc. Other possible
future designs that may make use of this combat engine include
fighting sail and ironclad time frames.
Contents
WCNAW uses a very intuitive mouse/keyboard interface. What this means is that the majority of the interface can be controlled with the mouse and various keyboard hotkey options.
Mouse
Command Abbreviations
LMB = Left Mouse Button
RMB = Right
Mouse Button
CMB = Center Mouse Button
WHL = Wheel Mouse
Function
Keyboard
Commands
BACKSPACE: End the battle early after which you can
start a new battle or exit the simulation.
ESC: Exits out of
various selections and dialogs.
F1: Toggle ship names or class
names during gunnery targeting / Pauses the combat resolution
sequence.
F4: Ship information display
F8: Game Options
F12:
Battle Save Option: Available during main battery targeting.
Space
Bar : Toggles the targeting information that is displayed beneath the
AI ship icons and ship or class names.
Gunnery: A-AP, C-CM, H-HE,
R-Ranging, S-Spotted, F-Full ROF
Torpedo Salvos: 1-5 salvos to
fire.
Combat Viewer / Interface Section / Ship Deployment Map
WCNAW, which uses a 3D/2D
hybrid interface, allows for 3 screen format options that can be
selected by opening up the "ScreenMode.txt" file that will
be placed in the main game directory after the first time the game is
run. The native resolution of WCNAW is 1024x768, however, the
viewable screen may able to be re-sized as noted below.
Screen
Mode Options:
Full = Re-sized to full screen display settings.
Window = Windowed in 1024x768 resolution. *Default
setting*
Scaled
= Scaled window mode.
Note: Some LCD digital monitor / video
card combinations will allow for a click and drag re-sizable window
using the “scaled” screen mode.
The
battle viewer, top section, will allow you to watch the battle take
place from a ship to ship viewpoint during the combat resolution
sequences. You will be shown notifications and combat results of
gunnery and torpedo hits in a viewer box.
The middle section
is for entering your orders, interface dialogs, combat resolution,
engagement ranges, visibility, weather, sea state, naval ensign
flags, game turn, and various ship data displays. Target
range/info information is shown to the right during target orders.
The firing ship and then the target ship will appear in the viewer
for both friendly and enemy ships as they engage their individual
targets. During the combat sequences you will see whether the target
ship was hit, straddled, or missed depending on the weapons used.
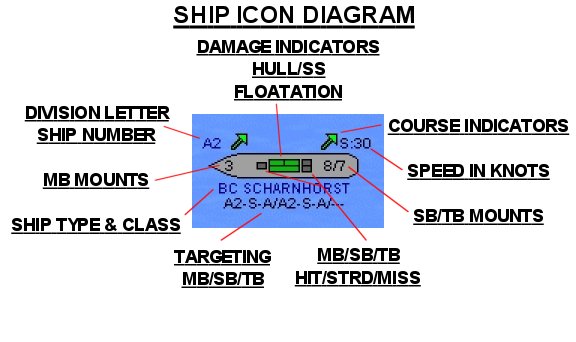
On the bottom left of the screen is the ship deployment
display. In the ship deployment display the divisions/ships selected
for viewing from both fleets are shown. Details and icons are shown
next to the ship icons as references and status reports during
combat. Make sure to look over the graphically detailed “Ship
Icon Information” section
of this manual for further details. Each ship is also given a
division letter, ship number per division, course icon, targeting
information, and speed indicator.
Contents
Tactical
Map
WCNAW
includes a tactical map, lower right hand portion of the screen, with
a resolution of 200 yards per x,y coordinate. The tactical map is
80,000 x 80,000 yards, or 40x40nm, in size with an option to display
a 10,000 yard incremented grid. When the cursor is moved over a
division icon on the tactical map general information about the
division will be displayed.
On the map you will see division
and ship location markers with course indicators. During game play
you can click on the division marker to display the ships in the
division on the ship deployment section on the interface thus
allowing for orders to be given for targeting, evasion, and
disengaging specific ships. During the division deployment (scenario
editor) and maneuvering orders the selected division will be
highlighted on the tactical map for easier reference. Gun battery,
torpedo, radar, searchlight, and visibility range arcs will also be
shown on the map, see below.
When ships are disengaging or
withdrawing from combat they must move off the edge of the tactical
map indicated by the “Map Exits” arrows shown on the
dialog bar to the left under the scenario parameter information.
Divisions, or ships, cannot overlap each other on the map and will
attempt to retain a distance of at least 400 yards from other
ships.
Note: The reason for the specified boundaries on the
map is to retain some reasonable consideration for directional
withdrawing, ships did not normally simply scatter in all directions,
and to retain some reason for being engaged in battle in the first
place – ships in combat were not there to simply just pass
through. This is also done to keep from having ships jumping off any
map edge to escape being destroyed. A larger 80x80nm+ tactical map is
being considered for a future update, however, even the largest naval
battles were primarily fought, or decided, within an area of only
around 20x25nm or less. WCNAW v1.1+ will include the option for using
maps with islands, shallows, and coastal terrain.
Tactical
map range circle colors:
* Blue – Torpedo type maximum
range.
* Red – Gunnery range based on gun battery
selected.
* Cyan – Visibility detection range.
* Green –
Radar detection range.
* White – Searchlight range.
Contents
Division
Deployment / Quick Battle Generator / Ship Division Deployment
Interface
The auto-deployment
option allows for divisions to be deployed automatically based on the
pre-determined tactical map positions of a loaded scenario or
semi-random placement for a newly generated scenario. If the
auto-deployment option is not used the positions of any generated or
loaded scenario can be changed prior to starting a battle.
The
quick battle generator allows you to start up a randomly generated
battle within a few quick and easy steps. After the fleets are
randomly selected, based on some parameters you select during
startup, you will have the ability to change one, or both, orders of
battle, the weather conditions, year, time of day, etc..
To
manually place a division on the tactical map using the division
deployment interface simply click on the division name and then click
on the tactical map location you want to the division to start at. To
change division course click on the arrow icon until the desired
course is indicated. The selected division will be highlighted on the
tactical map for easier reference. To change the “map exits”
for both fleets simply click the arrows for each fleet to the desired
course. The interface also includes the ability to adjust initial
division speed orders.
Note: Speed orders are shown as follows; O: Ordered speed / M: Maximum speed.
WCNAW is a turn based computer wargame. Each game turn represents 3 minutes of simultaneous combat and maneuvers. After all combat and maneuver orders are entered for the turn combat resolution will begin and then all damage, repairs, etc.. are calculated for the turn. Starting on game turn 60 there is an increasing chance per turn that a battle will end due to time length. Very few battles historically ever lasted more then 3-4 hours either due to ammo, fuel, or other possible concerns.
Contents
Starting
Range
The range at which generated and, not auto-deployed, battles will begin will be based on the maximum detection range using visual or radar methods plus some additional initial maneuvering space. This allows for some pre-battle maneuvering and initial detection to take place before the firing starts. Randomly generated scenarios with auto-deployed divisions will have their starting positions spread out slightly to allow for screening cruisers and/or destroyers to take a slight lead ahead of the battleline.
The game and battle
options can be accessed before combat begins. After a battle has
started all battle options and some game options are locked however
the remaining game options can be accessed by hitting the F8 key
while giving orders. All game and battle options are saved for future
battles until changed in the options dialogs. Game options include
game speed, fog of war (FOW), radars, background music, and ocean
sounds. Battle options include AI aggressiveness, gunnery ROF
options, shell ammo types, limited shell ammo, and dud
shells/torpedoes. Some of the options are explained below.
Game
Speeds
Slow
- All combat animations
Medium - Only straddle & hit
animations.
Fast - Only hit animations.
Report - Battle Report
only - no animations.
Battle
and Game Options
Gunnery
ROF options: Toggles 3 rate of fire settings or spotted fire
only.
Shell Ammo types: Toggles the option of 3 shell types or
default shell type available per battery.
Limited Shell Ammo:
Toggles between unlimited and limited shell ammunition.
Radars:
Fire control and search radars can be toggled on or off.
Dud
shells/torpedoes: Toggles the failures or duds chances for shells and
torpedoes.
AI aggressiveness: Optional low, medium, or high
aggressiveness AI levels.
Tactical Map Grid: Displays a 10,000
yard increment grid on the tactical map.
Locked course/speed: All
division tactical maneuver and combat orders will be locked prior to
initial contact.
Contents
Fog
of War (FOW)
FOW will allow for more realism by hiding the more detailed information about the AI controlled warships during maneuvers, combat, etc..
Detection
of enemy ships and divisions is achieved if they are in visual or
radar (WW2) contact range. If any ship in a division is detected then
all ships in that division are detected. Ships can only be detected
out to maximum visibility range or maximum radar effective range
(WW2). Ships can only be attacked if they are able to be detected,
and tracked, by either radar or visual means. Only fire control
radars F2-F3 can allow a warship to fire at a target without the need
for visual detection. Also, larger ships can be detected further away
then smaller ships using radar or visual detection.
Visual
Contact Ranges:
Battleship: 35,000 yards
Cruiser:
30,000 yards
Destroyer: 25,000 yards
Note: Whichever is
lower, visibility or visual contact range, is used for visual
detection.
Search/Fire Control Radars (WW2)
Search
and Fire Control Radars can be turned on or off with this option.
This option allows for the player to try out various engagements
without the benefit of radar for purely visual combat engagements.
The point values for the ships are base values without radar bonuses
however the bonuses will apply if radars option is used. The maximum
effective range of radars is reduced by rain or storm weather
conditions, moderate or heavy sea states, and the size of the target
ship. Radars are designated as search only radar (S) or search and
fire control radar (F). An example is shown in the chart below: S2
radar detects DD in moderate sea state at a range of 20,000
yards.
Radar
Detection/Tracking Ranges
S1/F1
- 25,000 yards
S2/F2 - 35,000 yards
S3/F3 - 40,000 yards
Effects
Of Weather, Sea State, Ship Size (cumulative)
Rain
Weather : -5000 yards
Storm Weather : -10000 yards
Moderate Sea
State : -5000 yards
Heavy Sea State : -10000 yards
Cruiser:
-5000 yards
Destroyer: -10000 yards
Fleet Size / Divisions of Ships / Date
If you choose the “random” option for ship class selections you will then be prompted for the size of fleets to be chosen, 1-32 ships per fleet (future updates will include the ability to fight larger battles). After you choose the size of the engaging fleets, or the manual selection option, you can then choose the year of the battle. The year chosen will determine which ship classes, or refits, are available to take part in the battle. The fleets start out divided up into divisions of ships. Each division, up to 4, can handle up to 8 ships each. The divisions are given the battleline, cruiser, or destroyer designations based on the largest ship in the division. (Note: Larger battles will be a feature added with a future update.)
Nationality / Ship or Class Names / Crew Ratings
There are multiple navy nationalities to choose from and you can also choose multinational fleets. You can select to have the country for each player or even each ship chosen at random. More countries will be added with future updates. Next you can choose the quality of the crews for each fleet which are crack, good, average, fair, and poor. Crew ratings have a very direct effect on how the ship will fight and manage repairs during combat. The quality of the crew will also adjust the point value of each ship. When not using the quick battle generator you can pick whether the simulation will show ship or class names during game play. Only custom designed battles or building a new scenario using the manual ship selection option will allow the ship names to be shown if they are entered into the scenario.
To display ship names vs class names of warships make sure to choose which you prefer during the startup options. During targeting and evading orders you can hit the “space bar” to toggle between ship and class names to be displayed. Note, only custom scenarios that include ship names will be available for this option.
Weather / Sea State / Visibility
There
are multiple weather, visibility, and sea state options to choose
from or they can be chosen at random. Night battles include the use
of star shells and searchlights and ships that are on fire will show
as illuminated. Ships that are not visible, behind smoke screen, or
not illuminated at night will show up as silhouettes. Weather
conditions have a direct effect the level of detection, quality of
fire control, and other related combat capabilities.
Visibility
is set by the scenario from 8,000 to 40,000 yards in 200 yard
increments. Weather settings include daylight, night (with 3 moon
phases), dusk, dawn, fog, rain, and storm. Sea state settings include
calm, light, moderate, and heavy.
In the startup options you can choose to have one, or both, of the fleets start the battle "surprised". Being surprised will not allow for any firing of weapons, evasion, and lock all divisions into a set course. After the surprised fleet detects an enemy warship or is fired upon by enemy gunfire there is a random chance of the surprised status being removed that is based on the average crew quality of the entire fleet. Ships that are surprised are more easily hit by gunfire or torpedoes.
The ship classes for each fleet can either be drawn randomly or chosen manually. If you select the manual option you will be shown a list of all ships available to each nationality based on the date of the battle you selected. Unavailable ship classes based on the date selected will be grayed out. At the top right of the screen you will see the ships you selected, crew rating, and point values tallied. If the random option is chosen the computer will draw from the available ships at that data selected and show you the list of ships chosen for each fleet. The country and number of points based on the options chosen are also shown on this screen. If you chose to have the new fleets selected then other random options that were picked on the previous startup screens will take effect again such as random fleet sizes and random nations.
Contents
Ship
Class Reference Chart
Below is a description of the information shown on the ship class reference chart.
*
Type: BB–Battleship, OB-Older Battleship, BC–Battlecruiser,
AC-Armored Cruiser (WW1), CA-Heavy Cruiser (WW2), CL-Light Cruiser,
DD-Destroyer, MN-Monitor
* Class: Ship class name.
* Year: Year
that the class entry represents. (r) is for major refit dates.
*
Navy: RN-Great Britain, KM-Germany, MN-France, RM-Italy, RU-Russia,
AH-Austria-Hungary, USN-United States, RN-Great Britain, MN-France,
IJN-Japan, KM-Germany, RM-Italy.
* HULL/SS/FLT: Hull,
Superstructure, and Floatation points.
* Gunnery Accuracy:
E-xcellent, G-ood, A-verage, F-air, P-oor {Gunnery accuracy is a
rating of the fire control quality and gunnery capability of the ship
class.}
* Fire Control Dates: DCT-Director Control Towers,
AFC-Automated Fire Controls. (WW1) {DCT and AFC were only used mostly
by the main batteries of the warships that had them.}
* Radar
Fit/Year: F-Fire Control/Search Radar, S-Search Radar, 1-3 = Level of
technology and quality. (WW2) {Maximum effective radar range:
1-25,000 yards, 2-35,000 yards, 3-40,000 yards}
* # Turrets:
Number of Main/Secondary/Tertiary Turrets or Mounts
* Main/Sec/Ter
Btty: [Cal: Caliber in inches, FP: Firepower, V/H Pen:
Vertical/Horizontal AP rating, Rng: Effective range]
{Firepower
is a calculated factor based on ballistics, shell quality, ROF, shell
dispersal, and other factors that directly affected the number of
shells that would land on target effectively.}
* Ammo Load: The
number of turns the battery can fire using maximum sustained rate of
fire. Slower rates of fire will result in a slower rate of ammo
depletion.
* Ammo types: A = Armor Piercing, C = Common or
Semi-Armor Piercing, and H = High Explosive or High Capacity shells.
* Armor/Protection Ratings: Belt/Deck Armor Ratings, Turret
Front/Top Armor Ratings, Secondary/Tertiary Battery protection
ratings. (Note: Superstructure armor is either a 1 or 0 depending on
the ship size and belt armor rating)
* Torpedoes: [# Mnts: # of
torpedo mounts, Trps/Mnt: # torpedoes per mount, Torp Dam: Base
damage rating]
* Speed: Maximum sustainable ship speed in knots.
*
PV: Base ship class point value. {Adjusted according to crew ratings
and radar quality.}
During game play you can hit the F4 key to see the ship display. Once you select a ship information will show up in an info box below a graphic of the ship in the battle viewer and in the dialog section of the interface. You will be able to see full details about your ships and if the FOW is on only limited details about the enemy ships. To see system damage status reports click the mouse again for the second screen of details that will show up in the dialog bar. Gun turrets/mounts are shown as "available / damaged / destroyed".
The
number of available main and secondary battery gun turrets directly
affects the amount of gunnery firepower a ship has. Each time a ship
sustains hull or superstructure damage a PK check is done to
determine the number of turrets that are damaged from the hit. Only
secondary and tertiary batteries can be damaged if the superstructure
is hit but all guns are checked if the hull is hit. Exception: All
guns on destroyers are checked if hit in the superstructure or hull.
The PK check is a calculated comparison of the maximum hull points of
the ship and the damage received. Main batteries that are hit have
their own separate AP vs armor PK rolls done to determine if the
turret is penetrated and knocked out. Penetrating hull hits will
automatically knock out secondary/tertiary turrets if they are hit.
Secondary/tertiary batteries will have their protection ratings
checked if they are hit by non-penetrating hull hits or straddle
splinter damage. The better the rating the better the chances
are for the turret to survive blast, fragmentation, or splinter
damage.
Gun turrets/mounts can be damaged or destroyed during
combat. If damaged there is a chance per turn that a turret/mount
will be repaired unless it is damaged again in which case it may be
destroyed. Destroyed turrets are not repairable.
Secondary/Tertiary
battery protection ratings:
0
- No protection
1
– Splinter shield or non-armored protection
2
– Gunhouse / casemate and/or light armor protection
Note:
Gun batteries that have suffered damaged turrets/mounts will show in
red
on
the map display.
During
night battles you will have the option of selecting enemy ships to be
illuminated by searchlights up to 10,000 yards range, but not beyond
visual range. Searchlight usage will give a bonus for all ships
firing at the illuminated target and the ship using the searchlight.
Star shells are automatically fired at ships that are targeted by
main guns in visibility range if available. A star shell graphic is
shown above each ship that is lit up by star shells. Searchlights are
ineffective when either the target ship or firing ship is deploying a
smoke screen. Star shells are ineffective when the target ship is
deploying a smoke screen.
Target
Ship Illumination Levels:
Smoke
screen: 0
Full moon or using searchlight: 1
Star shell: 2
Ship
on Fire: 3
Illuminated by searchlight: 4
Note: Star shells
are available to all navies in WW2 but only some navies had them by
various dates during WW1.
Tactical and Evasive Maneuvers
Each
game turn you will be prompted to enter a tactical and evasive
maneuvers for your divisions of ships, exception – see note
below. Click on a division icon on the tactical map to select
the division to give orders to. In the dialog bar you will be shown 3
division speed indicators as shown below. Click on the appropriate
icons to increase or decrease the ordered speed of the division in
one knot increments. The speed of a division is determined by the
slowest ship in the division and any ship with reduced speed due to
damage sustained will have its speed shown in red in the ship
deployment display. Evasive maneuvers by any ship within a division
will reduce the forward movement of the division by 20%, the speed of
the division is not effected. Divisions of ships will accelerate or
decelerate based on the largest ship in the division.
Note:
If the “locked course/speed” game option is activated
tactical maneuver orders will not be available until initial contact
has been achieved by either fleet.
Note:
Division speed orders will change according to the damage sustained
by the ships within the division. Example; if a ship cannot maintain
the maximum speed of the division the ordered speed will be reduced
to match the speed of that ship. The ordered speed can be increased
again if the ship has recovered speed due to damage control repairs.
A cyan highlighter will be shown on the tactical map for divisions
that are not moving at maximum sustainable speed for quick reference
during tactical maneuvering orders.
You can change course
and deploy smoke screens by clicking on the course indicator icon or
smoke screen text in the dialog bar. Smoke screens will only be
available for ships with a current speed of at least 8+ knots. Note,
changing course may possibly cause the division to lose some speed
depending on the severity of the turn and the ship classes included
in the division.
Any ship capable of 12 knots or greater speed
and that has sustained no steering system damage can conduct evasive
maneuvers with ships capable of speeds of 21 knots or faster being
able to conduct evading more effectively. Evasion affects both the
targeting of a ship and the firing ship, to a lesser degree, gunnery
accuracy. Disengaging or disabled ships cannot use evasive maneuvers.
Any division with more then 2 ships will be reduced in speed by 2
knots to maintain cohesion. During the evasive maneuvers phase you
can click on a division on the tactical map and then a specific ship
icon to toggle orders for us evasive maneuvers. A small cyan square
will appear above the ship icon on the ship deployment map when a
ship is using evasive maneuvers.
Division
speed indicators:
O : Ordered Speed
C : Current Speed
M :
Maximum Speed
Note:
Evasive maneuvers do not affect avoiding being hit by torpedoes as
they were historically meant to reduce the effectiveness of being
tracked by enemy gunfire control systems. The only real defense
against torpedo attacks was to comb the torpedo spreads if possible.
Attempted evasion of torpedoes is calculated within the combat
mechanics automatically.
Targets
can be chosen for the main, secondary, and tertiary batteries. Please
refer to the ship class reference chart for the maximum range for
each weapon. Gun batteries can only be targeted at enemy ships that
can either be visually detected and/or engaged with a fire control
radar of F2 or greater. During targeting orders you can click on any
of your ships to see a set of range circles on the tactical map to
see which targets are within detection and gunnery range. Target
range and other important information will be shown on the
information bar to the right when passing the cursor over any enemy
ship shown in the ship deployment section. You can select any
division on the tactical map to display the ships of the division for
targeting.
After you select a target you can then choose the
rate of fire and type of ammo you wish to fire at the target (if
these options are active). Below your ships you will see a "+++"
for targets are available, "---" no targets available,
"HOLD" holding fire, "xxx" if a battery is out of
ammo, or targeting indicators showing which target is being fired at
along with the type of ammo and rate of fire selected. Below the
enemy ships you will see how many batteries are targeted at each ship
with three indicators showing large, medium, and light guns. If you
hit the space bar this information will be toggled with the targets
the enemy ships are firing at. If a gun battery that has a target
runs out of the ammo you selected to fire you will need to select
another available ammo type so the battery can continue to fire at
the selected target.
If any ships have available targets while attempting to exit the targeting dialog a warning will be shown asking to confirm exiting or continuing the targeting phase. If you continue to exit all ships that are awaiting available targets will set their gun batteries to auto-hold until targeting orders are selected.
Secondary/Tertiary Gun Battery Auto-Targeting
An option for auto-targeting secondary and tertiary batteries is
available by hitting the "TAB" key during the targeting sequence. Each
turn that this option is active the auto-targeting will automatically
update the targetting for the gun battery for all ships in the player
fleet. Note, each battery will retain its auto-selected target until
the target is no longer valid, the battery runs out of ammunition, or
ordered to "hold" fire after auto-targeting is de-activated.
Rate
of Fire Options
Full rate of fire: Accuracy is reduced. Ammo
depletion is higher. Damage per hit may be higher.
Spotted fire:
Accuracy is normal. Ammo depletion is moderate. Damage per hit is
about average.
Ranging fire: Accuracy is increased. Ammo depletion
is lower. Damage per hit may be reduced.
Ammo Types
Armor
Piercing (AP): Designed to penetrate ships with thick armor
protection. May pass through ships with light or no armor
protection, or superstructures, resulting in minimal damage. Minimal
explosive filler due to a large armor piercing cap.
Common (CM):
Moderate armor penetration with an average explosive filler. More
effective vs. moderately armored warships such as cruisers and less
chance of passing through lightly or non-armored ships or
superstructures.
High Explosive (HE): Designed to explode usually
on contact with good effect vs. ships with very light or no armor
protection or superstructures. Increased explosive filler with
minimal armor penetration.
Note
1: Full rate of fire is calculated as a sustained maximum rate of
fire for the gun battery in typical combat conditions.
Note 2:
Common (CM) shells, for game purposes, include common and semi-armor
piercing types of ammunition. In general they were both designed to
have similar effects and used as a general purpose shell vs. a
variety of warships.
Note 3: Ammo depletion and firepower
calculations include rate of fire calculations based on engagement
ranges, shell flight times, loading cycles, gunnery adjustments per
salvo, etc.
During
the combat resolution sequence various dialogs may appear showing
some of the different effects on the combat calculations.
Range
- Range to target in yards.
Smoke Screen – A smoke screen is
hindering visual contact with the target either due to the firing,
target, or both ships deploying a smoke screen.
Target Ranged –
A target that was straddled or hit on the previous turn by the same
gun battery will receive a bonus.
Target, Firing, or Both Ships
Evading – Either the firing or target ships, or both, are using
evasive maneuvers.
Target, Firing, or Both Ships Disengaging –
Either the firing or target ships, or both, are disengaging.
No
Visual Contact – The target ship is being fired upon using
blind fire. Only F2 or F3 radars can be used for blind fire gunnery.
(WW2)
Fire Control Radar – FCR will give a bonus to gunnery
if within radar range. F1 radars also need visual contact to be used
for gunnery. F3 radars can assist with torpedo salvo accuracy.
(WW2)
If a hit is scored or damage is
inflicted due to straddle splinters an info box will appear below the
target ship in the battle viewer showing information about the damage
inflicted. If progressive flooding or a fire has started you will see
"SHIP FLOODING" or "SHIP ON FIRE" notices. The
info box will also notify you of gun battery turrets/mounts that are
knocked out, belt or deck shell hits, superstructure hit, magazine
explosions, or torpedo hits.
To aid in tracking which ships
are firing at various targets a dashed line is shown on the ship
deployment map. Red indicates gunnery fire and blue indicates torpedo
fire. This line will appear thicker for larger caliber weapons and
torpedo spreads with larger numbers of torpedoes.
Torpedoes
can be launched at enemy ships if within effective engagement range
of the torpedoes on board the firing ship. During targeting the
selected target, number of torpedo salvos, and the number of
torpedoes per salvo are shown below each ship that can launch
torpedoes. A blue range circle will be shown on the tactical map to
show the maximum range of the torpedoes carried by the firing ship.
Below the targeted enemy ships are the number of salvos and torpedoes
to be launched at available target ships. During the combat
resolution the number of salvos and torpedo types attacking each ship
are shown for both fleets.
Note:
If FOW is active then all AI torpedo attacks will be hidden from the
player unless a ship is hit by a torpedo.
All torpedo salvos can be launched per game turn by any destroyer. Only half of the torpedo salvos on board light or heavy cruisers can be fired per game turn. Battleships, battlecruisers, and armored cruisers with available torpedoes all had fixed torpedo tube mounts and thus can only fire one torpedo, or battery, at a time due to the difficulty of using these types of mounts in combat historically and the lower maneuverability of these classes compared to smaller warships.
Salvos of three or more torpedoes have incremental chances of scoring two hits on the target ship if any hits are scored. Larger salvos also have incrementally higher chances of at least scoring a hit. You can also choose the torpedo salvo spread; Narrow, Average, or Wide if more then one torpedo is fired. Wider spreads will have a higher chance of at least scoring a hit but lowers chance of scoring two hits. Narrower spreads have lower chances of achieving a hit but higher chances of scoring two hits. If the torpedo duds option is selected there is a chance of each torpedo hit not exploding. Duds will not inflict any damage to an enemy ship and represent faulty detonators, broaching, or other mechanical failures and in turn will be shown in the combat dialogs as misses.
Torpedoes
fired at targets at 4,000 or greater yards will require the firing
ship to have a target within a reasonable firing arc of 150
degrees to port or starboard. The number of game turns for
torpedo transit represents the travel speed of torpedoes in the water
which is calculated based on target range and torpedo
speed. Torpedoes will use their higher speed settings if they
are capable of dual speeds and are launched at shorter ranged
targets. If the target ship changes maneuvers before the
torpedoes arrive a reduction in accuracy will be calculated and a
penalty factor of 1 to 4 is shown during the combat resolution as
"target maneuvers".
Typical
combat effective engagement ranges:
Pre-WW1:
200-2,000 yards
WW1 : 600-4,000 yards.
WW2 : 600-8,000 yards.
Note: The ranges above are guidelines based on historical doctrines for most navies to try and acquire a reasonable chance for scoring a hit. All torpedoes simulated in WCNAW can be launched out to their maximum historical ranges.
Contents
Torpedo
Protection System - WW2
Most battleships and battlecruisers have some form of dedicated TPS to help reduce the damage of torpedo hits. These are listed on the ship reference chart and a reference is shown when the torpedo PK dialog is shown in the battle viewer and AAR. TPS levels are rated on a 1-3 scale with 3 being the best and are based on the effectiveness of the system and partly on the size of the ship and how the systems were designed into the hull. With each successive torpedo hit the TPS capability is reduced and if enough hits are scored the TPS will fail completely and no longer reduce the damage inflicted by torpedo hits. Higher ratings offer better and longer lasting protection against torpedoes hits. TPS and armor are handled with separate calculations for torpedo hits.
Firepower / Armor / Damage Results
The
damage that is inflicted on a target ship is calculated after the hit
has been determined if it has penetrated the armor of the ship.
Non-penetrating hits are shown in the battle viewer as grayed out
explosions and penetrating hits are shown as colorful explosions.
Non-penetrating hits will do less then half the average damage to a
ship compared to penetrating hits.
Note:
The firepower rating for a gun battery is halved when firing at
targets through the bow or stern arc, 60 degrees, of the firing
ship.
Straddled shell splinter damage can also
occur to non-armored, or very lightly armored, sections of a ship
when straddled by gunfire. The chance and amount of damage will vary
depending on the shells fired and target ship size.
The chance
of armor penetration is determined by the PEN rating on the ship
reference chart for gunnery, the range to the target ship, and which
armor location was hit. Torpedo damage ratings are used to determine
the penetrating power of any torpedo hits. The higher the shell PEN
rating or torpedo damage ratings compared to the target armor the
better the chances of a penetrating hit.
The overall damage
inflicted for each weapon that hits a target ship is based on a
series of calculations and can vary based on the firepower of the gun
battery, rate of fire selected, shell type, range to target, if the
armor is penetrated, etc... Torpedoes will usually cause the greatest
amount of floatation damage points to a ship and shells will usually
cause more hull and superstructure damage points. Hits on the belt
armor of a ship can cause more floatation damage points then hits on
the deck armor. Armor penetration calculations for gun turret/mount
armor are handled separately.
Damage results can include hull damage, superstructure damage, floatation damage, various ship systems being damaged, gun mounts, torpedo mounts, fires, progressive flooding, or magazine explosions. See the Damage Effects section for further details.
Combat
results:
Miss –
Target was missed
Straddled – Target was
straddled/ranged
Deck/Belt Hit – Target was ranged and hit
on a horizontal deck or vertical belt section of the ship.
Magazine
Explosion – Ship destroyed due to a magazine detonation.
D
– Hull damage points.
F – Floatation damage points.
S
– Superstructure damage points.
MB / SB / TB – Number
of mounts/turrets damaged
Note:
Due to the high rate of British AP shell failures prior to 1917 there
is a further chance of non-penetrating hit for any hits scored by
British BB, BC, or AC classes firing cruiser sized guns or larger.
This failure rate is higher for armor ratings that are higher or
equal to the impacting AP rating and less to none if the AP rating is
higher then the armor rating. A shell failure occurrence will result
in a much lower armor piercing and firepower factor for a hit. This
defect was corrected around 1918 with the advent of the Greenboy
shell AP shell design which is included in WCNAW.
Contents
In military terminology “PK” means probability of a kill on a 0-100% percentage scale. For many wargames and simulations, including WCNAW, PK determines chance to hit or of a possible outcome due to combat. Below is a description of PK dialogs in WCNAW. Exception, turret armor penetration PK is rolled per each turret hit so these are not shown in the PK dialog, only the chance of a penetration is shown.
The Battle Reports will be displayed after combat resolution is completed. The basic information for all gunnery and torpedo combat will be shown in the report and can be scrolled up and down using the mouse wheel or left button. To use the left mouse button click on the top or bottom half of the display.
PK
Dialog Information
RNG: Engagement range.
HIT-PK: Chance of
gunnery or torpedo hit.
STRD-PK: Chance of gunnery salvo
straddle.
ARMOR:B/D-TF/TT-SS: Armor of target - belt, deck, turret
front, turret top, superstructure
B/D-PK: Chances of belt or deck
hit angle.
AP: Armor penetration of shells based on range and
armor hit.
BELT/DECK AP-PK: Hull armor penetration PK
TURRET
AP-PK: Turret armor penetration PK
TORP HITS: Number of torpedoes
that hit *and* detonated.
DUD-PK: Chance of dud and/or defective
torpedoes.
BRG: Bearing to target.
ASP: Aspect of target.
Damage Effects / Damage Control
Damage is recorded at the end of each game turn. Damage affects hull damage, superstructure damage, floatation, ship systems, gun batteries, and torpedo mounts. By hitting the F4 key you can see the detailed status report for a ship. Exception: If FOW is active enemy ships will only be shown with limited detail. Damage control attempts are made after each round of combat. System and gun battery damage will not be repaired until any fires are extinguished or progressive flooding is stopped. Damaged torpedo batteries cannot be repaired. Successful damage repairs per ship will be shown after the combat resolution phase.
Hull/Superstructure
Damage Bar Icon:
Green
76-100% (Slight or no damage)
Yellow 51-75% (Light damage)
Orange
26-50% (Moderate damage)
Red 1%-25% (Heavy damage)
Note
1: A ship with no remaining superstructure points will have all fire
controls, radars, and search lights disabled and suffer bridge
system damage due to a loss of command and control or communications
efficiency. Further superstructure damage points may result in added
hull damage.
Note 2: A ship that has no remaining hull points will
be rendered disabled and unable to fire weapons. Further hull damage
points may result in added floatation damage.
Floatation
Bar Icon:
Green
76-100% (Slight or no floatation damage)
Cyan 51-75% (Light
floatation damage, speed loss)
Light Blue 26-50% (Moderate
floatation damage, speed loss, up to 25% gunnery firepower loss)
Blue
1%-25% (Heavy floatation damage, ship disabled, up to 50% gunnery
firepower loss, torpedo batteries inoperable)
0% (Sunk!)
Note
1: Floatation damage can also cause propulsion system damage due to
flooding in the engineering spaces of a ship.
Note 2: Speed loss
is calculated based on the specific amount of flotation damage the
ship has sustained.
System
Damage Effects:
Bridge:
A damaged bridge can cause disruptions with weapon firing and reduces
the effectiveness the crew and damage control.
Propulsion:
Propulsion damage will reduce the speed of the ship up to the point
of being disabled.
Fire Controls: Damaged fire controls will
reduce the accuracy and effectiveness of gunfire.
Steering:
Damaged - A ship can no longer use evasion. Destroyed - The ship will
disengage or be disabled.
Crew: Loss of crew effectiveness can
affect crew quality, forced disengagement, and eventually renders the
ship combat ineffective.
Searchlights : Once destroyed they can no
longer be used.
Radar: Damage will cause radars to become
unreliable and if destroyed they will be unavailable.
Note 1:
Different systems will be affected depending on the hull,
superstructure, or floatation damage sustained.
Note 2: Crew
damage is an indicator of crew casualties and level of effectiveness.
Note 3: Steering damage will cause a slight to moderate loss of
speed.
Fires
and Progressive Flooding:
When
a ship is hit by enemy fire there is a chance of a fire being started
due to hull damage or progressive flooding due to floatation damage.
At the end of each turn a check is made to see if a fire or
progressive flooding is stopped or if they produce further damage. A
severity level will be shown for each ship in the status display and
during the damage control dialogs. Severity level icons will also be
shown on the ship formation display.
Fire
Severity Levels:
Severity
Level 1: Light Fire, Yellow Fire Icon
Severity Level 2: Moderate
Fire, Orange Fire Icon
Severity Level 3: Severe Fire, Red Fire
Icon
Flooding
Severity Levels:
Severity
Level 1: Light Flooding, Cyan Flooding Icon
Severity Level 2:
Moderate Flooding, Light Blue Flooding Icon
Severity Level 3:
Severe Flooding, Dark Blue Flooding Icon
Smoke screens can be activated during the tactical maneuvers orders or are used automatically by a disengaging ship. A ship must have a current speed of 8+ knots to use a smoke screen. Smoke screens affect both the ships being fired at and their own firing when in use. The ships firing through smoke screens will have their gunnery and torpedo salvo hit chances reduced and gunnery firepower is also reduced if hits are scored. Ships deploying smoke screens will not be affected by their own smoke screens as often as ships firing at them with the exception of disengaging ships. Disabled ships, ships moving towards the enemy, or ships maintaining range cannot deploy effective smoke screens. Sea states higher then calm, rain, or storm conditions will reduce the effectiveness of smoke screens. Ships with radar fire control F2 or better can use their radars to assist with gunnery when firing through smoke. Smoke screens primarily effect the rear 120 degree arc of the firing and/or target ship that is deploying the smoke.
Losing Contact and Disengaging Ships
Divisions or ships that move beyond the map exit edges of the map will be considered moving off the battlefield and out of contact. If no ships from either fleet are detected for 25 game turns the fleets will automatically lose contact.
Ships with considerable damage, and that are not disabled (speed of 0), may be selected for disengagement. Divisions that include ships that are eligible for disengagement orders will be highlighted in yellow on the tactical map. A disengaging ship will detach from a division and automatically attempt to withdraw from combat while deploying a smoke screen, if the ship can maintain at least 8 knots of speed. Automatic ship disengagement may occur as shown below.
Automatic
disengagement
Steering
destroyed
Crippled ship – severe overall ship damage and
speed loss
Crew effectiveness <=50%
Contents
End
of Battle / Points Scored
After a battle has ended you will see an end of battle screen which allows you to restart WCNAW at the startup options screen, look over the ships using the ship display option, or exit WCNAW to Windows.
There are five ways a battle can end; 1) Both fleets have lost contact with each other for at least 20 game turns, 2) both fleets are either low on, or out of, ammunition, 3) all ships for both fleets are attempting to disengage, 4) one or both fleets are sunk, 5) the battle has lasted longer then 60 to 80 game turns. When a battle ends scores are tallied based on the amount of damage inflicted on the ships of both fleets. The total points are then multiplied by the bonus multiplier stated previously. Note: The overall damage level of a ship is figured for scoring which takes into account an average of the total ship damage.
Ship
Damage Scoring Chart
Light Damage: Point Value x1
Moderate
Damage: Point Value x2
Heavy Damage: Point Value x4
Sunk: Point
Value x8
Note: Bonus points for unbalanced
battles will be awarded to the weaker fleet. This is based on a
multiplier of final points scored during the battle. This allows for
unbalanced battles covering a variety of tactical situations.
In the AAR sub directory you will find a series of detailed WC-WW1-AAR or WC-WW2-AAR text files that you can open with any text editor and be able to read a detailed report of the battle you just played. These reports will be overwritten with each time WCNAW is started so if you wish to save a record of your battle just rename the file and/or move it to another folder. This file may be very useful for tech support so please keep a copy handy when you have any questions concerning the simulation. Up to five AARs will be available for the last 5 games you played. After five games they will be overwritten with each new game.
Load and Save Scenario Options
Just before combat begins
you can save the battle as a custom scenario (Note: 24 characters
maximum for file name length) which then creates a TXT based file in
your scenarios folder. This includes any randomly generated or custom
built scenario using the manual selection process. This scenario can
be loaded during the startup options of the simulation just after
some of the initial options are chosen. On the scenario loading
screen you will see a list of all files in your scenarios directory,
up to 200 scenarios, to choose from. After you pick a scenario to
load you can then pick which fleet to command.
The battle save
option allows you to save a battle and continue it at a later time.
This option is accessed by hitting the F12 key during the main gun
battery targeting dialog. Up to 200 battles can be saved.
Contents
Editing
TXT Based Scenarios Manually
The easiest way to create a scenario is to follow the manual selection process in the simulation. You can however edit a TXT based scenario using almost any text editing software. Note: The length of a scenario name can be 1-24 characters. Below is a description of the data included in a custom scenario. Lines with “:” on the end are for information purposes only. To follow the allowable settings shown below go ahead build a scenario of any kind and open it with a text editor or download one of the scenarios from the forums. [NOTICE: As future features are added to the simulation some of the layout of the data may be altered. These instructions will be updated as needed in future updates and support will be given for any scenario compatibility maintenance required.]
SCENARIO
TITLE:
{The title of your scenario. 1-95
characters.}
BRIEFING:
{The briefing of your scenario.
1-95 characters.}
DATE:
{YEAR}
WEATHER:
{DAYLIGHT,
DAWN, DUSK, NIGHT-FM, NIGHT-HM, NIGHT-NM, RAIN, STORM,
FOG}
VISIBILITY:
{Up to 40,000 yards in 200 yard
increments}
SEA STATE:
{CALM, LIGHT, MODERATE,
HEAVY}
SURPRISED:
{1-Player 1, 2-Player 2}
NATION:
{0-MIXED, 1-GREAT BRITAIN, 2-GERMANY, 3-FRANCE, 4-ITALY,
5-RUSSIA, 6-AUSTRIA-HUNGARY} (WW1)
{0-MIXED, 1-UNITED STATES,
2-GREAT BRITAIN, 3-FRANCE, 4-JAPAN, 5-GERMANY, 6-ITALY} (WW2)
FLEET
SIZE:
{1-32 SHIPS}
MAPEXIT:
{0, 90, 180,
270}
CLASS:
{SHIP CLASS}
NAME:
{SHIP
NAME}
DIVISION
1-4 {Shows up as A-D during game
play}
SHIP NUMBER
1-8 {Each division can have 1-8
ships}
CREW RATING:
{C-RACK, G-OOD, A-VERAGE, F-AIR,
P-OOR}
POINT VALUE:
{POINT VALUE}
COURSE:
{0-315
in 45 degree increments}
SPEED:
{Max ship speed in knots
for scenario}
TACMAPX:
{Tactical Map X
Position}
TACMAPY:
{Tactical Map Y Position}
FLEET
# DIV # SPEED ORDER
{Initial speed orders in knots}
The
following calculations affect the accuracy of gunnery;
*
Target speed, size, and range – Faster ships,
smaller, and longer ranged ships are harder to hit.
* Target
speed, course, and range change - Accuracy of gunfire is
adjusted by the severity of target speed, course, and range
changes,
* Weather – Weather quality affects accuracy. From
best to worst; daylight, dawn/dusk, night, rain/storm/fog.
*
DCT/AFC – Main batteries using director control towers or,
better yet, automated fire controls will receive a bonus. (WW1)
*
Fire control radar – The higher the rating the better the
bonus. Note: F1 radar is negated if the target is not within visual
contact or obscured by a smoke screen. (WW2)
* Smoke screen –
Target is being obscured by the firing ship and/or target
ship smoke screen.
* Firing ship being engaged –
Volume of fire and shells sizes are compared to the size of the
firing ship for any applicable penalty.
* Target being fired upon
by multiple ships using same sized shells – The more ships
firing at target, up to 5+, the higher the penalty.
* New
target – New gunnery targets required time acquire, bring all
guns to bear, and ranging salvos. If the new target is in the same
division as the previous target the penalty is reduced.
*
Illumination level – Includes moon phases, searchlights, star
shells, and ship fires.
* Size of shells being fired –
Larger shells typically had better ballistics then smaller shells at
longer ranges.
* Fire control – Fire control system quality.
If the fire controls are damaged then an appropriate penalty is
applied. (WW2)
* Firing ship size - Larger ships act as more
stable gun platforms and secondary and tertiary batteries are reduced
in accuracy compared to the main batteries.
* Ballistic profile -
Shell type ballistic profile accuracy adjustments.
* Crew rating –
Higher quality crews will have better chances of hitting targets.
This modifier is also adjusted in relation to crew effectiveness
status.
* Target aspect - Target aspect could effect the accuracy
of naval gunnery.
* Target previously hit or straddled –
A gun battery that ranged the target ship on the previous turn will
receive a bonus.
* Target and/or firing ship using evasive
maneuvers – Penalties will apply if the target and/or firing
ship is using evasive maneuvers.
* Sea state – Sea state
effects compared to the size of the firing ship.
* Surprised
status – Surprised targets are easier to hit due to lack of
combat maneuvering and firing ships that are surprised take a
penalty.
* Monitor (MN) fire controls – Monitors have a
harder time hitting moving targets due to their fire controls being
primarily designed for bombardment gunnery.
* ROF –
Sustainable ROF modifies the level of damage and straddle/hit
accuracy scaled according to range to target.
* Gun barrels –
Gunnery accuracy is modified according to the number of barrels
firing at the target which determines the dispersion of the salvo and
ability to adjust fire.
* Advanced Range Scaling – Range
scaling can effect the intensity and accuracy of firepower at short
to medium gunnery ranges.
(Note: The gunnery firepower
ratings for each class of ship represent the effective ROF,
ballistics ratings for individual gun mounts, firing arcs, shell
dispersal, FC qualities, and shell quality. The factors are not
represented in a linear scale. All factors are individually
calculated and based on authoritative research materials.)
The following calculations affect the accuracy of torpedo salvos;
*
Size of salvo fired – More torpedoes per salvo will result in a
higher chance of at least one hit. 2 hits are possible if the spread
is 3 torpedoes or more.
* Range to target – Longer ranged
targets are harder to hit.
* Weather – Weather quality
affects accuracy. From best to worst; daylight, dawn/dusk, night,
storm/fog.
* Target size and speed – Smaller and
faster target ships are harder to hit.
* Smoke screen –
Targeting is obscured by the firing and/or target ship smoke
screen.
* Illuminated – In order of most effective to least
effective during night battles: Searchlights, star shells, and ship
fires.
* Crew rating – Higher quality crews will have
better chances of hitting targets. This modifier is also adjusted in
relation to crew effectiveness status.
* Target aspect - A target
with a narrower aspect is harder to hit.
* Torpedoes per spread -
More torpedoes per spread increases the chance of a hit.
* Torpedo
spread width - Wider spreads will have a higher chance of at least
scoring a hit but lower chances at scoring 2 hits.
* Sea state –
Moderate and heavy seas will affect the PK chance of torpedo
attacks.
* Surprised status – Surprised targets are easier
to hit due to lack of combat maneuvering and firing ships that are
surprised take a penalty.
* Type 93 torpedoes – IJN Type 93
torpedoes have a slightly higher hit PK due to their being harder to
spot and having a very high speed. (WW2)
* Fire control radar
– A firing ship with F2 or F3 will reduce the effects of firing
at a target through a smoke screen or during poor weather quality.
(WW2)
* Target ship maneuvers - Target ships that change maneuvers
during the transit of the torpedo salvo will cause a reduction in
accuracy.
Gunnery
Targeting Data Information
Firing ship
Target
ship division and number - Rate of Fire - Ammunition Selected
Rate
of Fire : R = Ranging, S = Spotted, F = Full
Ammunition Type : A =
AP, C = COM, H = HE
Target ship
Large
caliber batteries – Medium caliber batteries – Light
caliber batteries
Ship Class Types
BB : Battleship
OB :
Older Battleship
BC : Battlecruiser
AC : Armored Cruiser (WW1)
CA : Heavy Cruiser
(WW2)
CL : Light Cruiser
DD : Destroyer
MN : Monitor
Ship
Map Icons![]() : Capital Ship
: Capital Ship
![]() : Cruiser
: Cruiser
![]() : Destroyer
: Destroyer
![]() : Not Illuminated
: Not Illuminated
![]() : Firing Guns
: Firing Guns
![]() : Hit
: Hit
![]() : Missed
: Missed
![]() : Straddled
: Straddled
![]() : Launching Torpedoes
: Launching Torpedoes
Note: The letter to the top left
of the icon is the division that the ship is operating with and the
number to the right is the division number of the ship in the
division.
Gun
Turrets/Mounts
Numbers
shown in the ship map icons are available gun mounts/turrets.
If the number is shown in red
then damage to the
batteries has been sustained. The targeting icons are arranged in the
same order as the numbers.
Left : Main battery
Right:
Secondary Battery and Tertiary Battery![]() : Target Hit
: Target Hit
![]() :
Target Straddled
:
Target Straddled
![]() :
Target Missed
:
Target Missed
![]() : No Target
: No Target
Combat
Icons![]() : Ranged 1X
: Ranged 1X
![]() :
Ranged 2X
:
Ranged 2X
![]() :
Ranged 3X+
:
Ranged 3X+![]() : Evading
: Evading![]()
![]()
![]() : Ship Fire Severity Levels
: Ship Fire Severity Levels![]()
![]()
![]() : Progressive Flooding Severity Levels
: Progressive Flooding Severity Levels![]() :
Smokescreen
:
Smokescreen ![]() : Searchlight Target
: Searchlight Target
![]() :
Using Searchlight
:
Using Searchlight
![]() :
Target
:
Target
Arrow
Colors:![]() : No Speed Loss
: No Speed Loss
![]() : Light Speed Loss
: Light Speed Loss![]() : Moderate Speed Loss
: Moderate Speed Loss
![]() : Heavy Speed Loss
: Heavy Speed Loss![]()
![]() : Disengaging
: Disengaging
Note:
No arrows indicates the ship is disabled or not detected.
Note:
Numbers above the arrows indicate ship speed. If shown in red there
is speed loss due to damage.
Hull / Floatation /
Superstructure Damage Indicators
![]() : Minimal or No
Hull or SS Damage
: Minimal or No
Hull or SS Damage![]() : Light Hull - SS Damage
: Light Hull - SS Damage![]() :
Moderate Hull - SS Damage
:
Moderate Hull - SS Damage![]() :
Heavy Hull - SS Damage
:
Heavy Hull - SS Damage![]() : Minimal or No
Floatation Damage
: Minimal or No
Floatation Damage![]() : Light
Floatation Damage
: Light
Floatation Damage![]() :
Moderate Floatation Damage
:
Moderate Floatation Damage![]() :
Heavy Floatation Damage
:
Heavy Floatation Damage
Note: Top right = Hull damage, Top left = Superstructure damage, Bottom = Floatation damage.
Christopher
Dean and William Miller
Naval Warfare Simulations
Projects
Design Team
Special thanks to the NWS Beta Team who have been helping with this naval wargame.
MP3 music score composed by Jeff Edwards.